8 Years Strong: New Releases for You!

Hey there, creative souls! Can you believe it’s been 8 amazing years since we embarked on this artistic journey together? To mark this milestone, we’re thrilled to unveil our brand-new releases for October 2023. But hold on to your hats because there’s even more reason to celebrate. As we end our anniversary month, we’re giving you an awesome 50% off on everything across our site until October 31st! Yes, you heard it right – the whole shebang at 50% off! (visit site for details)

Here at HAI Supply, we’re known for quality adhesive washi materials that stick around, quite literally! Plus, we’re always on the cutting edge when it comes to sequin jewels and gem production. We’ve got a soft spot for cardmaking, scrapbooking, paper crafting enthusiasts, and those who just love a good DIY project. If you’re into using nifty tools like punches, die cuts, embossing folders, and glitter, you’re in the right place.

Let’s dive into the new goodies we’ve got for you this month:

Mi Navidad Washi Sheets – $16.00

Deck the halls with our “Mi Navidad” Washi Sheet Sets, celebrating Latin-American holidays. We’re talking 20 unique 6×6-inch designs that capture the joy of traditions. From Ponche to piloncillo-themed sheets, and images of Latin-American treats like tamales and churros, these sheets are bursting with culture. Make holiday cards, preserve memories, and bring a festive touch to your projects. These sheets are all about creating traditions like never before!

Inkie Alcohol Washi Sheets – $16.00

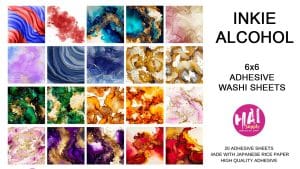
Take your creative journey to the next level with our “Inkie Alcohol” 6×6 Adhesive Washi Sheet Sets. Dive into vibrant Greens, Blues, Reds, Pinks, and Purples, each adorned with intricate alcohol ink designs on 20 stunning 6×6-inch Japanese rice paper sheets. Express yourself with “Inkie Alcohol” and let your creativity flow like never before!

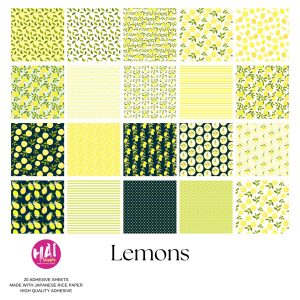
The Bees Washi Sheets – $16.00

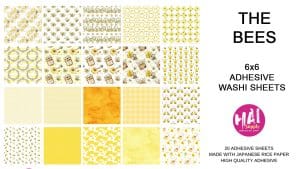
Get closer to nature with ‘The Bees’ Washi Sheet Sets featuring 20 charming 6×6-inch designs inspired by bees and the great outdoors. Dive into shades of yellow, bee-inspired patterns, honeycombs, and more. Craft with inspiration and add a touch of elegance to your projects. Let the beauty of bees be your muse!

Silky Sakura Washi Sheets – $16.00

Elevate your crafting game with “Silky Sakura” 6×6 Adhesive Washi Sheet Sets. These elegant sheets feature 20 unique cherry blossom designs in predominantly white. They’re all about effortless layering and subtle color play. Whether you’re a seasoned pro or just starting out, these sheets are a breeze to work with using punches, dies, embossing, and powders. Let the beauty of cherry blossoms inspire your creations!

Watercolor Florals Washi Sheets – $16.00

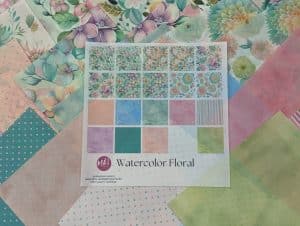
Dive into a world of soft pastel-themed flowers in pinks, blues, greens, and yellows with our “Watercolor Florals” 6×6 Adhesive Washi Sheet Sets. Enhance your projects with these elegantly translucent sheets that allow for easy layering and blending. They’re perfect for crafters of all levels looking to create endless possibilities!

And that’s not all, folks! We’ve also got something special for our artist friends:

Soft Chalk Pastel Set – 24 Colors – $17.99

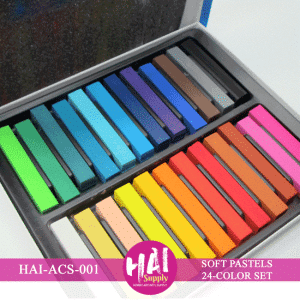
Calling all artists! Our soft pastels are your new best friend. Crafted with high-quality pigments, these 2.5-inch-long pastels are both water-soluble and safe for use. They’re perfect for traditional and unconventional applications, from blackboards to nail art. Whether you’re into delicate detailing or bold strokes, these pastels have got you covered. Plus, they come in sets of 24 and 64 pieces.

Soft Pastel Chalk Set – 64 Colors – $24.99

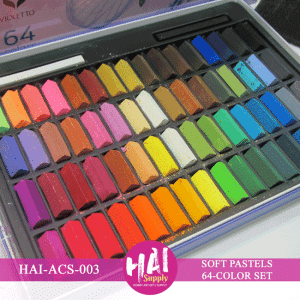
Unleash your artistic genius with our versatile and non-toxic soft pastels. Crafted with high-quality pigments, they’re water-soluble and safe for artists of all levels. You can use them on blackboards, in nail art, and more. With a design that’s perfect for delicate details and bold strokes, these pastels are wrapped up safe and sound with fixative and protective packaging.

So there you have it, folks! Our October 2023 releases are here to add a splash of color, culture, and creativity to your projects. Whether you’re a seasoned pro or just starting out, there’s something for everyone. Thank you for being part of our creative journey, and here’s to many more years of crafting magic together!

Don’t forget to use your exclusive 30% off site-wide coupon until October 31st, and let’s create something amazing!

The Magic of Washi Tape and Your Planner!

Hey there, office dynamos! 🚀 Tired of the same old mundane planner pages in your busy office life? Spice things up with the enchanting world of Washi tape! If you’re juggling appointments, meetings, and deadlines in a bustling medical practice or a buzzing school campus, this creative tool can be your secret weapon.

1. The Color-Coded Calendar Revolution:
Ever felt like your office calendar was stuck in a grayscale movie? It’s time to add some color to your scheduling adventures! Get an array of colors that resonate with you and your work. Lay these colorful strips along the edges of your calendar pages. Now, when you jot down your appointments or to-dos, use the matching Washi tape color. It’s like giving your tasks a vibrant personality! Say hello to a rainbow of organization that not only looks fabulous and supercharges productivity. 🚀

2. Crafty Tabs for Quick Navigation:
Ever wished your planner had secret tunnels to zip through your notes effortlessly? Your wish is granted, thanks to the wonders of Washi tape! Choose your favorite Washi tape designs and patterns – let your personality shine through! Cut these sheets into delightful mini rectangles, then fold them in half to create adorable tabs.
Stick these tabs right onto your planner pages. With these snazzy tabs, your planner becomes a treasure map, and you’re the intrepid explorer. Finding critical info has never been this easy and stylish! 🗺️💼

3. Sprinkle Positivity with Washi Magic:
Let’s be real; office life can sometimes feel like a rollercoaster ride. But what if your planner could inject positivity into your day? Scout out Washi tapes with cheerful designs, or elements that make you grin from ear to ear. Transform these tapes into mini stickers or beautiful borders. Adorn your planner pages with these little bursts of joy, especially on hectic workdays.

With that, your workdays are about to get a vibrant makeover, and it’s going to be an incredible journey! So, grab your Washi tape, and let the office planner transformation begin! 🎨📆💪


Jazz Up Your Journaling with Washi Tape

5 Super Fun Tips!

Hey there, fellow journal enthusiasts! 📖✨ Today, we’re diving into the colorful, wacky world of washi tape. Get ready to turn your journal into a canvas of creativity, and trust me, it’s gonna be a hoot! So, put on your creative cap, and let’s get started.

1. Pick Your Palette: Color Me Happy!

First things first, let’s talk colors and patterns. Washi tape comes in a gazillion shades and designs. It’s like a candy store for crafters! Want a chill vibe? Go for soft pastels. Feeling funky? Get those neon stripes! Choose tape that matches your mood or makes you grin like you just heard a hilarious joke. The crazier, the better!

2. Header Havoc and Border Bliss

Headers are like the fashion statement of your journal. They’re the cool hat you wear to a party. Make ’em pop with washi tape! Layer different tapes for a header explosion. Borders, on the other hand, are like the fancy frame around a masterpiece. Mix and match tape widths and patterns to make your pages scream, “Look at me, I’m fabulous!”

3. Divide and Conquer: Say Hello to Dividers

Ever heard of dividers? They’re like the superheroes of your journal, keeping things organized and tidy. Use washi tape to create dividers, separating your pages into sections. It’s like giving your journal its own little comic book chapters. You’re the author, and your washi tape is your trusty sidekick!

4. Corner Cuteness: The Sneak Attack

Want to add a dash of charm without going overboard? Try corner accents! It’s like your journal giving a sly wink. Just stick some washi tape on the corners and snip off the extra. Ta-da! You’ve got a hint of pizzazz without taking up too much real estate.

5. Tip-Ins: The Journaling Magic Trick

Okay, brace yourself for this one because it’s pure journaling magic. Tip-ins are like secret compartments in your journal. You can stash notes, pictures, or even your secret candy stash (shhh, we won’t tell!). Stick ’em in with washi tape, and the best part? You can take ’em out whenever you want. It’s like having your journal and eating the candy too!

The bottom line, folks, is that using washi tape in your journal should be an absolute hoot. Let your creativity run wild! Mix those colors, stack those patterns, and let your journal be your canvas of fun. It’s your playground, and washi tape is your playful partner in crime. So, go on, journaling adventurer, grab that tape, and let the good times roll! 🎉📖😄

Crafting Joy with HAI Supply Quality

Hey there, fellow craft enthusiasts! At HAI Supply, we’re all about turning your crafting time into an exciting adventure. We understand that crafting isn’t just a pastime; it’s your creative playground. That’s why we’ve poured our heart and soul into bringing you the most delightful sticky adhesive washi sheets out there.

Elevate Your Crafting Experience Our adhesive washi sheets are here to take your craft projects to the next level. We’ve meticulously crafted them to ensure they’re absolutely fantastic. And guess what? Our recent experience at the Scrapbook Expo was an absolute blast! When you choose HAI Supply, you’re not just crafting; you’re crafting with pure joy!

Unleash Your Inner Artist With HAI Supply adhesive washi sheets, your creative possibilities are endless. Craft charming butterfly stickers, embellish photo frames, and design stunning card backgrounds. It’s like having a magic wand for your crafts!

Craft with Confidence Crafting should boost your confidence, and our adhesive washi sheets are here to support you. We’ve designed them for top-notch quality and versatility. We want you to feel like a crafting superstar with every project.

Your Crafting Partner in Crime Think of HAI Supply as your trusty crafting sidekick. We’re not just offering adhesive washi sheets; we’re providing you with the keys to a world of crafting happiness. Get excited, let your imagination soar, and let’s create wonderful things together!

Thanks a million for being part of the HAI Supply crafting family. Stay tuned for more exciting updates. Happy crafting, and let’s dive into the world of creativity together! 😄🎨🌟

Artist Trading Cards (ATCs)

Hey craft fans! 🌟

Artist Trading Cards (ATCs) with Linh from LV Handcraft took us to a whole new world and we had to share this with you! Brace yourself for a creative adventure packed with inspiration! Here’s what we’ve learned from Linh’s crafting trip:

  1. Small Canvases, Big Ideas 🖼️: ATCs aren’t just tiny artworks; they’re little canvases for big creative adventures in a small space. Linh’s ATC journey showed us their potential for storytelling and self-expression. 📜✨

  2. Craft Joy with Premium Washi 🌈: Meet your ultimate crafting buddy—premium washi paper! Linh showcased its fantastic qualities: gentle stickiness, easy adjustments, and perfect organization. Say goodbye to crafting mess and hello to a neat crafting zone! 📦🧶

  3. Building Crafty Bonds through ATC Swaps 🤝: Linh’s active participation in a seven-person ATC swap lit up the community side of crafting. Crafting for others and receiving their creations builds friendships among crafters, sparking ideas and teamwork. 🎁👫

  4. Efficiency and Precise Details 📏: Linh’s crafting journey highlighted efficiency and paying attention to details. From simplifying her process to adding neat rounded corners, these techniques improved her creations. 🌟✂️

As we dive deeper into crafting, let’s embrace the magic of ATCs and the crucial role of premium washi paper in your creative adventures. Whether you’re a seasoned pro or new to crafting, remember that crafting is your playground, and every project is a unique masterpiece. 🌈🎉

Click here to view her video:
https://www.youtube.com/watch?v=lYtTr-srqbc 

Stay inspired, stay passionate, and keep crafting! 🌼🎨

👉👉#GiveHerTheMoney 👈👈

WASHI: QUALITY OVER QUANTITY

Prioritizing Adhesive Quality 🌟

Hello, Crafty Friends!

We hope you’re having a blast with HAI Supply’s 6×6 Adhesive Washi Sheets! 🎨✂️

Today, we want to share a tip that can make your crafting even more fun. When you’re picking out washi stuff, remember one thing that’s super important but often forgotten: how sticky it is. Yep, the stickiness matters!

🌟 Sticky Magic: Sticky stuff, also known as adhesive, is like the superhero of your crafting adventure. It’s what keeps your masterpiece together. So, before you get all excited about pretty colors and patterns, check if your washi tape sticks well. HAI Supply’s Premium Washi Tapes are great at sticking, which means your crafts will last longer and not fall apart.

✨ Bye-Bye Craft Fails: We’ve all been there – you spend a bunch of time making something cool, and then it falls apart because the sticky stuff wasn’t good enough. But don’t worry! If you pay attention to sticky quality, you can avoid those frustrating craft fails.

Imagine this: You’re crafting away with your favorite washi tape, and your creation not only looks awesome but also stays put. That’s what happens when you pick washi stuff with good sticky power!

And guess what? Our HAI Supply catalog has lots of washi tapes and sheets that are not only pretty but also super sticky. So, whether you’re making cards, scrapbooking, or just having crafty fun, you’ll find the perfect stuff in our catalog.

But there’s more! When you choose HAI Supply, you’re not just getting awesome craft stuff; you’re joining a community of craft lovers who are just as excited as you are about creating cool things. So, dive into our catalog today and let your creativity run wild!

The next time you’re crafting with washi tapes, remember it’s not just about looks – it’s also about how well it sticks. Craft with confidence, knowing your art will stay put.

We’d love to hear your crafty tips and stories! Share them with the gang, and let’s celebrate the joy of crafting together! 💌

With lots of crafty spirit,

HAI Supply

Crafting Brilliance with Linh

Get ready to embark on a magical crafting journey with Linh as your guide as we unveil the wonders of HAI Supply’s new 6×6 Washi Sticker Sheets! Crafting isn’t just a pastime; it’s a passion that sparks joy and ignites creativity. In Linh’s captivating YouTube video, she introduces these remarkable sticker sheets that promise to take your crafting experience to new heights.

Prepare to inject your projects with style and pizzazz because these sticker sheets are your new crafting best friends. They bring vibrant themes, adhesive wizardry, and a sleek yet robust design to the crafting table, all of which Linh expertly showcases in her tutorial.

In this introduction, we’re about to dive deep into the treasure trove of features that make HAI Supply’s 6×6 Washi Sticker Sheets truly exceptional. Get ready to kindle your creative spark, simplify your crafting journey, and embark on an adventure where innovation knows no bounds, all under Linh’s expert guidance. So, brace yourself for an exciting ride with Linh’s YouTube video as your inspiration, and let these versatile crafting companions be your gateway to a world of crafting enchantment!

Surprise and delight with a unique handmade Valentine’s card

Valentine’s Day is quickly approaching, and what better way to show your love and affection than by creating a handmade card using our craft supplies? Our selection of sequins, decorative washi tape, and decorative paper can help you create a unique and personalized card that is sure to impress that special someone.

The joy of creating a Valentine’s Day card extends beyond just the act of making it. Giving a handmade card shows thoughtfulness and effort, and can be a heartfelt and meaningful gesture. And receiving a handmade card, whether from a significant other or a dear friend, can be just as special. It’s a reminder that someone took the time to think of you and create something just for you.

But the joy of creating and receiving a Valentine’s Day card goes even deeper than that. Creating a unique card for a unique individual is a way to express your love and appreciation in a personal and meaningful way. And receiving a unique card from someone you may have not known was thinking of you can be a surprise and delight, much like listening to a romantic song by a beloved artist. Just as the song “te amo corazon” by Prince can stir feelings of love and romance, a handmade Valentine’s Day card can do the same.

So this Valentine’s Day, consider spreading the love and joy by creating a handmade card using HAI Supply craft supplies. Your special someone (and your own creative spirit) will thank you.

Happy crafting!

Aerial Firework Pop – Up Card

Aerial Firework Pop – Up Card
by Meenal Dhariwal

I’m sharing how to create a fun pop up card which uses two pull tabs. When you pull the tabs one after the other, the aerial firework is launched and leaves it’s shell and explodes high up in the sky and makes a bright beautiful display of lights. To make this card, please follow the step by step tutorial.

Materials required:


Step 1.

– Cut a black card-stock panel which measures: 4 inches * 8 inches.

Make two horizontal slits in the center of the panel which is placed vertically. The slit’s width is slightly smaller than half of an inch, one at 3.5 inches (1a) and the second at 7 inches (1b). This will create a track for the plastic strip. 

Now, take the plastic strip and cut it slightly smaller than the slit’s width so that the plastic strip can move smoothly. It’s height is approximately 8 inches.

Then cut two bracket shaped slits [ ]  measuring 7/8 of an inch wide. One at 3.25 inches and the other at 7.25 inches.

– From the Japanese washi paper pack, choose the firework pattern paper and the largest firework from the same. With the help of a die, cut a circular disc from the black card-stock measuring 3.25 inches in diameter. Score a line with a bone folder on it slightly off center.

– We require two pull tabs for the mechanism to work.

The first measures 5.25 inches * 0.75 inches (2a).

And the second measures 9.75 inches * 0.75 inches (2b). Score a line with a bone folder at 9.5 inches on this pull tab and taper the ends slightly with a scissor from this score line to the end of the pull tab as shown in the reference.

– We also need a small tab measuring 1.25 inches * 0.75 inches. Draw a spark of light with the gel pen.


Step 2.

Insert the plastic strip through the slits, turn around the card panel and overlap the ends to make a loop. Make this overlapping near the first slit (1a). Secure the ends together with a double sided tape. Now add another piece of double sided tape on the plastic strip on the same position as the tape below. Release the liner paper and stick the top end of the pull tab (2a) to it.


Step 3.
Insert the other end of the pull tab (2a) through the slit and bring it out 

on the front side of the card panel.


Step 4.
Now cut the firework pattern from the same circle die (3.25 inches) and adhere it to the circular card-stock disc with a strong liquid glue.


Step 5.

Fold the scored line on the circular disc to make a valley fold. Stick only the small half (remember how we scored the line slightly off center) of it to the card panel at 2.5 inches, making sure the crease of the folded disc is parallel to the card panel.


Step 6.

Now fold the scored line on the second pull tab (2b) and make a mountain fold. Adhere the folded end to the circular disc so that the end of the pull tab is aligned with the crease of the disc.


Step 7.
Insert the pull tab (2b) through the bracket slits and bring it out on the front panel. (Back view of the card panel).


Step 8.

Stamp and heat emboss the ‘celebrate’ sentiment on a piece of vellum sheet and attach it to the spark tab with a liquid glue.

Stick this piece to the plastic strip towards the end (near 1b) with a double sided tape.


Step 9.

Adhere the sparkly 3mm clear white stars randomly to imitate the beautiful stars in the sky. Mount this panel on card base with some foam tape making sure nothing impedes the mechanism.


Step 10.
For the mechanism to work, pull the small tab (2a) first and then pull the long (2b) immediately.

FALLING SEQUINS CARD

Step by step guide to create a falling sequins effect in a DIY card


Don’t you love a cute and fun card with lots of sequins? This DIY project is for you. Sequins can be hard to work with because of their size, but once you see the final result, all your effort is going to be so worth it.

The fun part of using sequins is all the shapes, colors, and effects you can make with them to boost your creativity and crafting game. This time we will share with you the falling sequins technique by one of our favorite collaborators, Meenal Dhariwal. 

Try this modified interactive shaker rainbow card idea with the falling sequins technique is very easy to do and affordable. You don’t need to have professional skills. You only need patience and lots of sequins to play around with.

Follow the tutorial made by Meenal Dhariwal. She explains it step by step with full clarity. This is an amazing idea to try for a birthday or an anniversary and wow your friend or your significant other.

Materials

To be able to do this card you need the following material:

  • Rainbow hearts sequins by HAI Supply
  • Black stars sequins by HAI Supply
  • Card panel 4.25 x 5.5 inches
  • Rainbow colors of cardstock
  • Two pieces of craft foam
  • Craft book adhesive transfer sheets
  • A print paper
  • Double-sided tape
  • A heart shape die
  • Die-cutting machine
  • An acetate sheet
  • Liquid glue
  • Scissors
  • Marker or stamp.

Steps to make a rainbow card with falling sequins

  1. Cut your rainbow cardstock in small but long stripes. Use double-sided tape to paste them on a piece of print paper. Place one color after the other to make it seem like a rainbow. This element will go right in the middle of your card panel.
  2. Place the rainbow piece on the top center of the card panel. With a medium size heart shape die, trace it right in the middle of it. You will want to make a little window in the center of the panel.
  3. Glue the rainbow piece to the card panel. Cut the remaining part that is hanging off the edge. Place again the heart die, you can secure it with little pieces of tape and send it to the die cutting machine. But don’t throw away the cut piece, you will need it later.
  4. The next step is to write a cute phrase. It will depend on the occasion, but this time we will go with “You color my world”. Meenal is using a stamp, but if you don’t have one, you can do basing lettering with a marker. It will look pretty too.
  5. Now is time to do the fun part. Place little dots of liquid glue on the card front so you can adhere to the black stars sequins. Make sure to place them randomly for a better look.
  6. Take the two pieces of craft foam, make sure that they are slightly smaller than the card panel. You can use three of them so the sequins can fall easily. You can adhere the pieces together with the craft book adhesive transfer sheets.
  7. Make sure to burnish the adhesive sheet very well on the craft foam. You can use a bone folder. Now you can remove the liner paper and stick the other craft foam piece to it. Take your time to do this step. No pressure.
  8. Place the front panel on the craft foam. Pop in the heart shape piece back in its original position. Remember, the one little cut piece we saved from step 3. Remove the front panel and place the heart die on the die-cut piece and mark the outline with a pencil. By doing this you will know the exact position of the window of the front panel on the craft foam.
  9. It’s time to work on the hidden veil for the sequins. Use a circle die. Place it right on top of the heart die but keep a small space between them. Secure it with tape and send it to the die-cutting machine.
    Tip: Make a little sign or line to remember which side is up, so you know which side will go attacked to the front card panel.
  10. Grab the acetate sheet that is slightly smaller than the card panel. Use liquid glue on the edges to adhere to it behind the front panel.
  11. Let’s do the skinny pull tab that will bring the falling sequins technique alive. Grab a piece of heavy-weight cardstock. Cut it in three little pieces of four inches long each. Adhere them all together with liquid glue.
  12. To make the stopper for the pull tab draw a line on the left of the craft foam and draw the track for the pull tab between the circle and heart die-cut shapes. The track width is wide enough for the pull tab to fit in properly. With a pair of scissors cut the lines for the track.
  13. To connect both of the windows draw a guideline and cut those pieces. Now you will see how the circle and heart shapes are one. Use liquid glue on all the edges to stick it to the back of the front panel. Make sure the heart windows are perfectly aligned with each other.
  14. Time to use the rainbow heart sequins! Before pouring them into your card, make sure you have placed the pull tab correctly between the circle and the heart die cut. Now, pour the rainbow heart sequins in the circle window. Use how many as you want.
  15. We are almost done. Now that everything is in place, you have to seal it. Take another card panel of 4.25 x 5.5 inches and glue it very well to the back of your front panel. This will keep your sequins from falling out of place.
 

You are done! Now you can turn it around and play around with it. Pull that tab out and watch the sequins falling like rain from the rainbow you made in the center. Doesn’t it look very pretty and magical?

These beautiful sequins can be found at our online stores or check our store locator any of the 50 stores located in the USA and Canada. We have more shapes and colors that can bring your DIY projects alive. We love when you show your works on Instagram, tag us if you use one of our embellishments.

Watch Meenal’s YouTube video here: https://youtu.be/NHpcb4G5RJU

[embedyt] https://www.youtube.com/watch?v=NHpcb4G5RJU[/embedyt]

Guía paso a paso para crear efecto de caída con lentejuelas para tarjetas DIY

¿No te encantan las tarjetas bonitas y creativas con muchas lentejuelas? Este proyecto de hazlo tú mismo es perfecto para ti. Hay ocasiones que trabajar con lentejuelas no es nada fácil debido a su tamaño, pero una vez que veas el resultado, todo tu esfuerzo habrá valido la pena.

La parte divertida de usar lentejuelas es todos los colores, formas y efectos que puedes crear para darle un empujón a tu creatividad y a tu habilidad de manualidades. En esta ocasión vamos a compartir contigo la técnica de efecto de caída con lentejuelas por parte de una de nuestras colaboradoras favoritas, Meenal Dhariwal.

Intenta hacer esta tarjeta de arcoíris interactiva con la técnica de caída de lentejuelas. Es muy fácil de hacer y económica. No necesitas tener habilidades profesionales. Solo necesitas paciencia y muchas lentejuelas para jugar.

Sigue el tutorial de Meenal Dharwila. Ella te explica paso a paso con total claridad. Esta tarjeta es una buena idea para sorprender a un amigo o pareja en su cumpleaños o aniversario.

Materiales

Para poder hacer esta tarjeta necesitas el siguiente material:

– Lentejuelas de corazón arcoíris
– Lentejuelas de estrellas negras
– 2 piezas de opalina blanca de 4,25 x 5,5 pulgadas
– Opalina en colores arcoíris
– Dos piezas de foami
– Hojas transparentes de transferencia adhesivas
– Una hoja de papel
– Cinta doble cara
– Troquel de corazón y círculo
– Maquina troqueladora
– Una hoja de acetato
– Pegamento líquido
– Tijeras
– Rotulador o sello

Pasos para hacer una tarjeta arcoíris con efecto caída de lentejuelas

  • Corta las opalinas de colores en tiras iguales. Con la cita doble cara pégalas en una hoja de papel. Coloca cada color a lado del otro para formar un arcoíris. Esta pieza va a ir justo en medio de la pieza de opalina blanca.
  • Coloca el arcoíris que formaste en la parte superior central de la opalina blanca. Pon el troquel en forma de corazón de tamaño mediano justo en medio y dibuja el contorno. De esta manera vas a hacer una pequeña ventana.
  • Pega tu pieza de arcoíris a la opalina blanca. Corta la parte que sobresale de ella. Vuelve a colocar el troquel de corazón y asegúralo con un pedazo de cinta. Está lista para ser enviada a la máquina troqueladora. Pero no vayas a tirar la pieza que cortaste, la vas a ocupar más tarde.
  • El siguiente paso es escribir la frase que más te guste en frente de la tarjeta. Va a depender de la ocasión, pero para este proyecto vamos a poner la frase “Tú coloreas mi mundo”. Meenal utilizó un sello, pero si no cuentas con algo similar, puedes utilizar un marcador y hacer un poco de lettering.
  • Ahora es momento de hacer la parte divertida. Coloca pequeños puntos al azar en el frente de tu tarjeta con pegamento líquido. Abre tu paquete de lentejuelas de estrellas negras y coloca una por una en los puntos que hiciste.
  • Toma dos piezas de foami. Asegúrante que sean un poco más pequeñas que tu tarjeta. Para asegurar que peguen bien puedes utilizar una hoja transparente de transferencia adhesiva.
  • Asegúrate de presionar bien la hoja adhesiva sobre el foami. Ahora sí puedes retirar el papel de revestimiento y coloar la otra pieza de foami. Tomáte tu tiempo para hacer este paso. No te presiones.
  • Coloca la opalina blanca sobre el foami y pon la pieza en forma de corazón de vuelta en su posición original. ¿Recuerdas la pequeña pieza cortada que guardamos del paso 3? Retira la opalina blanca, vuelve a colar el troquel de corazón sobre la pieza de corazón cortado y marca el contorno con un lápiz. Cuando hagas esto sabrás la posición exacta de la ventana de la opalina blanca en el foami. Mándalo a la máquina troqueladora.
  • Es hora de trabajar en el velo oculto de las lentejuelas. Agarra el troquel de círculo y ponlo justo encima del corazón que ya cortaste en el foami, pero deja un pequeño espacio entre ellos. Asegúralo con un pedazo de cinta y vuélvelo a enviar a la traqueladora.Tip: Haz una pequeña línea o trazo para identificar cuál es el frente y sepas cuál lado es el que vas a pegar a la opalina blanca.
  • Agarra la hoja de acetato, procura que sea más pequeña que la opalina blanca. Con el pegamento líquido adhiérela detrás de la opalina.
  • Hagamos una lengüeta delgada que dará vida a la técnica de caída de lentejuelas. Coge un trozo de opalina gruesa, córtalo en tres pequeñas tiras de cuatro pulgadas de largo cada una. Pégalos juntos con el pegamento.
  • Para crear el tope para la lengüeta dibuja una línea a la izquierda del foami y un trazo entre las formas de círculo y corazón. El ancho de la línea tiene que ser lo suficiente para que la lengüeta quepa correctamente. Con unas tijeras corta las líneas que trazaste.
  • Para conectar ambas ventanas, dibuja dos líneas y cortalas. Ahora verás como el círculo y el corazón son una sola figura. Utiliza pegamento líquido en todos los bordes del foami y pégalo a la parte trasera de tu tarjeta. Asegúrate que las ventanas de corazón estén alineadas a la perfección entre sí.

¡Es tiempo de usar las lentejuelas de corazón de arcoíris! Antes de verterlos en tu tarjeta, coloca la lengüeta en su lugar entre la ventana de círculo y corazón. Vierte todas las lentejuelas que gustes en el círculo.
Ya casi terminamos. Todo está en su lugar, es momento de sellarlo. Toma el otro pedazo de opalina blanca de 4.25 x 5.5 pulgadas y pégalo muy bien a la parte posterior de la tarjeta. Esto evitará que las lentejuelas se salgan de su lugar.


¡Está lista! Ahora puedes darle la vuelta y jugar con ella. Jala la lengüeta de su lugar y observa cómo las lentejuelas caen como lluvia del arcoíris que hiciste en el centro. Se ve muy bonito y mágico, ¿verdad?

Estas hermosas lentejuelas las puedes encontrar en nuestras tiendas en línea o en cualquiera de las 50 sucursales ubicadas en EE. UU. y Canadá. Tenemos más formas que le pueden dar vida a tus proyectos de bricolaje. Nos encanta cuando nos muestras tus trabajos en Instagram, etiquétanos si usas alguno de nuestros adornos.

Watch: Meenal’s YouTube video here: https://youtu.be/NHpcb4G5RJU

[embedyt] https://www.youtube.com/watch?v=NHpcb4G5RJU[/embedyt]